iStingor Tone Lab
Guitar Pedal Tone Tips
How to Make Your Sound Clearer, More Dynamic, and Easier to Fit in the Mix
iStingor Tone Lab
How to Make Your Sound Clearer, More Dynamic, and Easier to Fit in the Mix
When dialing in electric guitar tone, many players instinctively reach for more pedals, more gain, more bass, or more reverb. But a stable, professional, and truly usable guitar tone rarely comes from simply turning one knob higher. It comes from a complete signal system: the guitar, pickups, cables, pedal order, gain structure, EQ, amplifier, power supply, and the player’s touch.
A good tone is not always the most impressive sound when heard alone. A good tone remains clear, powerful, dynamic, and musical inside a full mix, without fighting the bass, drums, vocals, or another guitar. The following methods are written for players who already understand the basics and want to take their tone control to a more professional level.
The first step in dialing in tone is not to turn on every pedal. It is to make sure the basic signal is healthy.
Start with the simplest possible signal path:
Guitar → Amplifier
Turn off all pedals first. Set the amp EQ around the middle position and begin with a clean, natural base sound that is neither too bright nor too dark. This sound becomes the foundation for everything that follows. If the base tone is already muddy, harsh, or lacking dynamics, even great pedals will only amplify those problems.
Many players underestimate the guitar itself. The Volume knob on an electric guitar does more than control loudness. It changes how hard the signal drives a distortion circuit or amp preamp, which affects gain, compression, and response. The Tone knob is not simply a way to make the sound darker. Rolling off a small amount of top end can make single-coils less harsh and can also make high-gain tones smoother.
A practical approach is to dial in a sound that is still usable with no pedals on. Then add pedals one by one. This makes it much easier to hear exactly what each pedal improves — or what it damages.
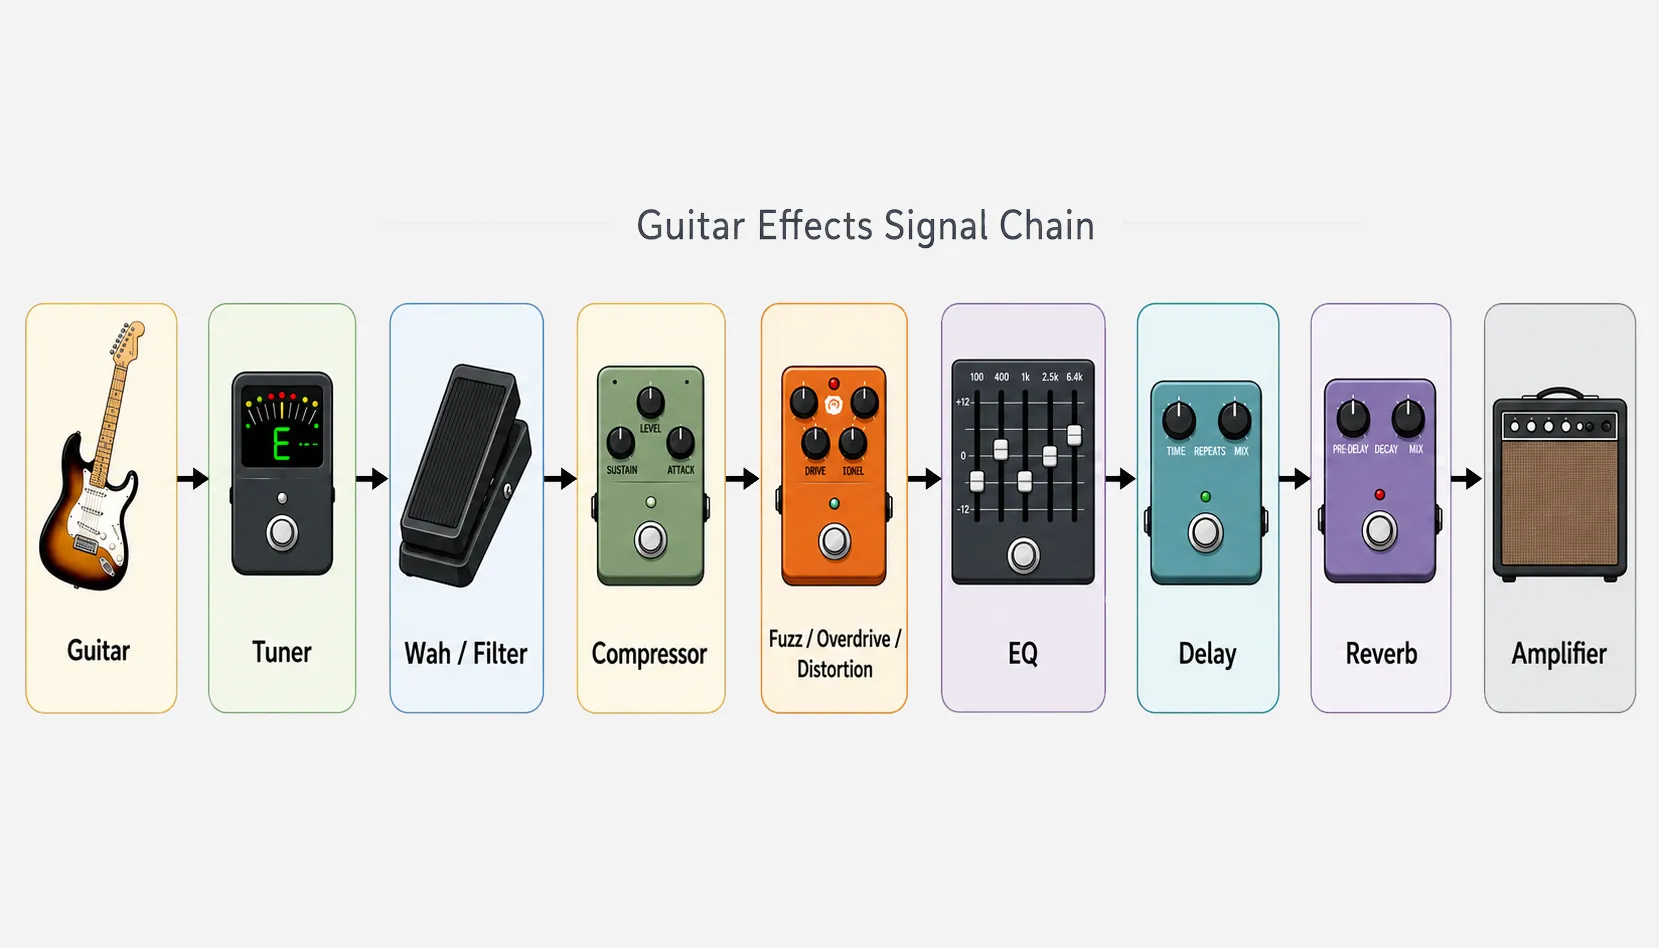
A common basic signal chain can be understood like this:
Guitar → Tuner → Wah / Filter → Compressor → Fuzz / Overdrive / Distortion → EQ → Modulation → Delay → Reverb → Amplifier
This is not an absolute rule, but it is a reliable starting point.
Effects such as Wah, Auto Wah, and Envelope Filter are usually placed near the front because they need to react directly to the pickups and playing dynamics. Compression is also often placed early in the chain to smooth out dynamics and add sustain. Overdrive, distortion, and fuzz form the main tone-shaping stage. Modulation effects usually sound clearer after distortion, while Delay and Reverb are typically placed later to create a more natural sense of space.
If you use the amp’s own distortion channel, Delay and Reverb usually work better in the amp’s Effects Loop. When delay repeats and reverb tails are placed before an already distorted amp preamp, they are distorted again, which can quickly make the sound blurry. By contrast, if your main distortion comes from pedals into a clean amp, placing Delay and Reverb after the distortion pedal usually works well.
There are exceptions. Vintage-style fuzz circuits, especially designs that are highly sensitive to input impedance, often prefer to be connected directly after the guitar. If a buffer, tuner, or wireless system is placed before them, the response may become thinner, harder, or lose the ability to clean up naturally from the guitar’s volume knob. The point of pedal order is not to memorize a formula, but to understand what kind of signal each stage is processing.
High gain does not automatically mean good tone, and more distortion does not always sound heavier. In many cases, turning the Gain too high makes the sound smaller, flatter, and muddier. Excessive clipping compresses the dynamics and smears pick attack, chord separation, and low-end definition.
It helps to separate three ideas:
Gain controls how hard the signal hits the clipping or amplification stage. It affects distortion amount, compression, and harmonic density.
Level / Output controls the pedal’s output volume.
Master / Amp Volume controls the overall drive and loudness of the amplifier or power stage.
A common mistake is using a boost before distortion when the real goal is to make a solo louder. In that position, the boost usually adds more distortion and compression, not necessarily more volume. A boost before distortion mainly increases gain; a boost after distortion behaves more like a volume lift.
If you use two gain pedals together, try this approach:
Low-Gain Overdrive → Main Distortion / High-Gain Pedal
The first overdrive does not need much gain. Lower the Gain and raise the Level slightly, using it like an EQ-shaped front-end driver. This can tighten the low end, push the midrange, and make the following distortion stage more focused and easier to cut through.
Stacking gain pedals does not mean turning everything up. A more useful approach is to let each stage do one job:
This usually produces a more controlled tone than maxing out one high-gain pedal.
Many players buy more overdrives and distortions but underestimate EQ. In reality, EQ can often change how well a guitar sits in a band more than changing the pedal itself.
The electric guitar is not a full-range instrument. Its core voice lives in the midrange and upper midrange. Too much low end may sound thick alone, but it competes with bass guitar and kick drum in a band. Too much high end may sound clear alone, but it can become harsh and fatiguing live or in a recording. Too little midrange may sound modern when practicing alone, but the guitar can disappear in a full mix.
A practical way to understand common frequency ranges:
80Hz–120Hz: Low-End Weight
This area affects the impact of palm muting, but too much can make the sound loose, especially with high gain.
150Hz–300Hz: Body and Mud
A moderate amount gives the sound body. Too much makes the tone dark, boxy, and muddy.
400Hz–800Hz: Boxiness, Nasal Character, and Vintage Voice
Cutting some of this area can sound more modern. Keeping some of it gives the guitar a stronger midrange identity. Cutting too much can make the guitar lose presence.
800Hz–2.5kHz: Cut and Solo Presence
This is a critical range for electric guitar. Many classic overdrives cut through a band mix largely because of their midrange structure. A solo does not always need only more volume; a controlled lift in this range is often more effective.
2.5kHz–4kHz: Pick Attack and Harshness
This range can add clarity, but too much can make the tone hard, sharp, and tiring.
5kHz–8kHz: Air, Fizz, and Hiss
With high-gain tones, this range often contains fizz and hiss. Controlling it can make the sound feel more like a real amplifier and less like sandpaper.
EQ behaves very differently depending on where it sits in the chain.
EQ before distortion changes the frequency balance entering the clipping stage. In other words, it changes how the distortion is created. For example, cutting low end before distortion can make high gain tighter, while boosting mids can make the clipping more focused.
EQ after distortion changes the final sound after the distortion has already been created. For example, cutting harsh top end or adding a little midrange after distortion can be more effective than continuing to adjust the Gain knob.
EQ at the end of the chain is useful for adapting the whole rig to different amps, rooms, or recording setups.
A more advanced habit is to avoid dialing in EQ only while playing alone. Always check the tone against a backing track, drums and bass, or a real rehearsal mix. A tone that sounds perfect by itself may not work once it enters the mix.
Many high-gain players turn the Bass control very high because they want a heavier sound. But true heaviness usually comes from tight low end, clear midrange, and solid rhythm, not from piling on more bass.
When too much low end enters a distortion stage, it creates more intermodulation distortion. The result is not always thicker; often it is just muddier. This becomes especially obvious with fast palm muting, drop tunings, seven-string guitars, or eight-string guitars. If the low end is not controlled, the guitar loses its edge and begins to cover the bass and drums.
A more useful approach is:
At home, especially at low volume, you may feel the sound needs more bass. But in a rehearsal room or on stage, louder speakers and room reflections often make the low end expand dramatically. This is why live tones usually need less Bass than home practice tones.
Many players dislike midrange because, when heard alone, too much midrange can sound nasal or less “hi-fi.” But in a band, whether the electric guitar can actually be heard is largely decided by the midrange.
Scooped mids can work for some modern metal rhythm tones, but they should not be used blindly. When Bass and Treble are high and Mids are low, the tone may feel wide, aggressive, and exciting by itself. Once it enters a band mix, however, the guitar can be squeezed out by the bass, cymbals, and vocals, leaving only low-end rumble and high-end fizz.
Lead tones need midrange even more. Very often, a solo does not fail to stand out because it is too quiet; it fails because it lacks midrange. A controlled lift around 800Hz–2kHz can be more natural and less harsh than simply raising the Level control.
A practical approach is to use slightly less midrange for rhythm if the vocal needs space, then add midrange and a small amount of volume for lead tones so the melody can step forward in the mix.
A compressor can make volume more even, add sustain, and make clean tones feel fuller. It works well for funk, country, clean arpeggios, and light-overdrive lead tones. But compression is not a universal solution.
Compression reduces dynamic range and can also raise the noise floor. If a high-gain distortion comes after it, the compressor may make pickup noise, finger noise, and background hiss more obvious. High-gain rhythm tones often do not need much compression before distortion because distortion already compresses the signal heavily.
The purpose of a compressor is not simply to make the sound louder. It is to control transients. If Attack is too fast, the pick attack can disappear. If Release is poorly set, the sound can pump unnaturally. If Sustain is too high, noise rises with it.
If you use a compressor, start with a low amount of compression. Let it gently organize dynamics instead of flattening every pick stroke into the same level.
Delay is one of the easiest effects to make a tone feel more polished, and also one of the easiest ways to make a performance feel messy.
The three main controls are:
Time: delay time.
Feedback / Repeat: number of repeats.
Mix / Level: delay volume.
If the goal is simply to make a solo fuller, use a medium-short delay time, low feedback, and a low mix level. The delay should not compete with the dry note. It should sit behind the note and add space and sustain.
Useful starting points:
Slapback Delay
Around 80–140ms, very little feedback, and a modest mix level. Good for blues, rockabilly, classic rock, and adding thickness to single-note lines.
Lead Delay
Around 280–450ms, two to four repeats, with the mix kept below the dry signal. Good for solos and melodic lead lines.
Dotted Eighth Delay
Useful for rhythmic delay parts. It is not just a space effect; it becomes part of the groove. The tighter the playing, the better it works. If the timing is loose, it quickly becomes messy.
A simple way to calculate delay time:
Quarter-note delay time = 60000 ÷ BPM
Eighth-note delay time = 30000 ÷ BPM
Dotted-eighth delay time = 45000 ÷ BPM
For example, at 120 BPM, a quarter note is 500ms, and a dotted eighth note is 375ms.
With high-gain tones, the key is to control Mix and Feedback. The more distortion you use, the cleaner and more controlled the delay should be. Otherwise, repeats stack on top of the dry signal and fast phrases lose clarity.
Reverb gives the sound a sense of space. But bigger space is not always better.
Room, Plate, Spring, Hall, Shimmer, and other reverb types simulate different reflection patterns, tail densities, and frequency responses. A short Room reverb can make a dry tone feel less close and exposed. Spring reverb has a distinct vintage character. Plate reverb is smoother and works well for clean and lead tones. Hall reverb sounds larger but can become blurry more easily. Shimmer and large ambient reverbs are powerful for atmosphere, but they are not suitable for every part.
For most live and rehearsal situations, Reverb should be lower than what feels comfortable at home. A real room already has reflections. The louder the amp, the more the room affects the sound. A reverb level that feels perfect at low volume at home may turn into a wash on stage.
A simple principle:
If the tail of the last phrase is still heavily building up before the next phrase begins, the Reverb Decay or Mix is probably too high.
Chorus, Phaser, Flanger, and Tremolo are all effects with strong character. They can make the sound wider, more fluid, and more animated, but they can also become excessive very quickly.
Chorus works well for clean tones, arpeggios, 1980s-style sounds, fusion, and certain lead tones. Too much Depth can create an obvious detuned feel, and too much Rate can make the tone wobble unnaturally. Often, a mature chorus setting is not one that makes people immediately notice the effect, but one that makes the sound wider, thicker, and more spacious.
Phaser works well for funk, classic rock, psychedelic sounds, and some lead tones. Its sweep changes the midrange position, so the depth should be controlled carefully when used with distortion.
Flanger is more dramatic than Chorus and has a stronger metallic, jet-like character. It is useful for special sections, but rarely works well when used heavily all the time.
Tremolo changes volume over time, not pitch. It can be placed after distortion, or before or after Delay and Reverb, producing different rhythmic feels.
For more advanced players, a good starting point is to use modulation in smaller amounts. If turning it off makes the tone suddenly narrower and drier, but turning it on does not sound exaggerated, the setting is usually more musical.
High-gain tones naturally amplify noise. Pickup noise, power supply noise, cable problems, ground loops, lighting interference, and preamp noise can all be amplified stage by stage in a high-gain signal chain. Noise control should therefore be considered as a complete system, not as a single isolated issue.
Common noise sources include:
A noise gate works by reducing or muting the signal when it falls below a threshold. It can make silent gaps cleaner, especially for modern metal rhythm playing. But a noise gate does not truly remove noise while you are playing. When you play, the gate opens, and the noise is still present — it is simply masked by the musical signal.
If a noise gate is set too aggressively, it can create side effects: note tails get cut off, quiet details disappear, playing dynamics become stiff, and the sound may develop an unnatural “on/off” feel. A noise gate is useful for cleaning up silence, but it should not be the main foundation of tone design.
A better direction is to reduce noise at the source: use a sensible gain structure, control unnecessary high-frequency bandwidth, improve grounding and shielding, use clean and stable power, and avoid compressing noise before amplifying it.
This is why iStingor emphasizes ultra-low-noise design in the high-gain SL-1 and MS-1 pedals. They are not designed around an internal noise gate that simply “cuts off” noise during pauses. Instead, they focus on reducing noise at the source through high-gain circuit structure, frequency control, and system-level noise management. For high-gain players, this has a very practical meaning: you can still use an external noise gate when needed, but you do not have to rely on it as the only way to hide noise.
It is important to be realistic: no genuine analog high-gain circuit can be completely noise-free. The professional goal is not to claim impossible “zero noise,” but to keep noise low enough that the tone remains dynamic, articulate, and usable even at high gain.
If a pedal system suddenly becomes noisy, thin, or dull, do not immediately assume that a pedal is broken. Many problems come from power and signal transmission.
Power should be checked in three areas:
Many pedals use 9V DC center-negative power, but not all devices are the same. Wrong voltage can damage equipment, and wrong polarity can create serious problems. Insufficient current can cause noise, abnormal distortion, digital pedal resets, or unstable operation.
If your pedalboard contains multiple pedals, especially a mix of digital delay, reverb, modulation, and analog high-gain distortion, isolated power is usually more reliable than a basic daisy chain. A daisy chain is not always unusable, but when noise, crosstalk, or ground-related problems appear, isolated power is often the more professional solution.
Cables also affect tone. Long cable runs and many true-bypass pedals in series can gradually reduce high frequencies. This is not cable mythology; cable capacitance interacting with a high-impedance guitar signal can create a low-pass effect, making the tone darker and softer.
This is where a buffer can be useful. A well-designed buffer converts the high-impedance guitar signal into a lower-impedance signal that is better suited for long cable runs and complex pedal chains. But more buffers are not always better. Some vintage-style fuzz circuits can lose their interaction with the pickups if a buffer is placed before them. Buffer placement should be judged according to the specific rig.
A simple test:
Home Practice
At home, the volume is usually low, and the low end and dynamics may not fully develop. This often leads players to turn up Bass, Gain, and Reverb too much. Those settings can become excessive in a rehearsal room or on stage.
Home practice suggestions:
Band Rehearsal
In rehearsal, judge the tone inside the full band sound. You are not competing with yourself; you are sharing frequency space with drums, bass, vocals, and possibly another guitar.
Rehearsal suggestions:
If you cannot hear yourself, try midrange and speaker placement first, then volume. Do not immediately add more Treble or Gain.
Recording
Recording tones usually need to be more controlled than live tones. This is especially true for double-tracked rhythm guitars. Too much distortion can make both sides blur together instead of sounding wider.
Recording suggestions:
Noise matters more in recording because hiss that seems minor on one track can become obvious when several tracks are layered.
Live Performance
Live tone is about stability, clarity, and control. The audience hears the whole system, not the small area where you are standing in front of the amp.
Live suggestions:
If the venue is loud and reflective, space effects should be more restrained. A professional live tone is not the one with the most effects, but the one where every note can be heard clearly.
When building a new tone, use this order:
Do not judge tone only by knob positions. Twelve o’clock does not mean flat, and different circuits respond very differently. The reliable method is to listen to where the guitar sits inside the music.
A mature electric guitar tone should pass at least five checks:
First, are single notes clear?
Fast phrases should not blur into one mass.
Second, do chords have separation?
Even with high gain, you should still hear the interval structure, not only a wall of noise.
Third, is the low end tight?
Palm muting should have impact without dragging or booming.
Fourth, does the midrange stand up?
The guitar should not disappear in a band mix.
Fifth, is the noise controlled?
Silence should not be embarrassing, and noise should not interfere with the performance.
If a tone sounds exciting alone but disappears in a band, it is not truly useful. If it sounds huge in a room but turns muddy in a recording, it is not a mature tone. A truly good tone works in the musical situation where it is meant to be used.
There is no single guitar tone setting that is always correct. Different guitars, pickups, amplifiers, rooms, and musical styles all require different decisions.
But the professional approach is consistent:
Once you understand what each stage of the signal chain is doing, pedals stop being simple on/off devices and become a real tone-design system. Great tone is not a number on a knob. It is the ability to make every note speak clearly and musically in the right context.